Yo, what's up gamers! It's your boy back at it again, and today we're diving deep into one of VALORANT's most iconic and, let's be real, sometimes frustrating maps: Ascent. I've spent countless hours grinding on this floating piece of Venice, and let me tell you, mastering it is the key to climbing those ranks. Forget what you think you know about its "predictability"—in 2025's meta, Ascent is a chessboard for the mind, and I'm here to give you the grandmaster strategies.
Ascent isn't just another map; it's a monument to the VALORANT Protocol's biggest failure. That's right, lore heads! This chunk of Venice is floating because a Spike detonation went completely wrong. But for us players, it's a perfect training ground. Its dual-site structure, decently-sized Mid, and a million corners force you to use every single ability in your agent's kit. Whether you're bouncing flashes off walls or setting up sneaky one-ways, Ascent rewards creativity like no other. And with all maps now available in Unrated and Swiftplay, there's no excuse not to get good. Let's break it down!
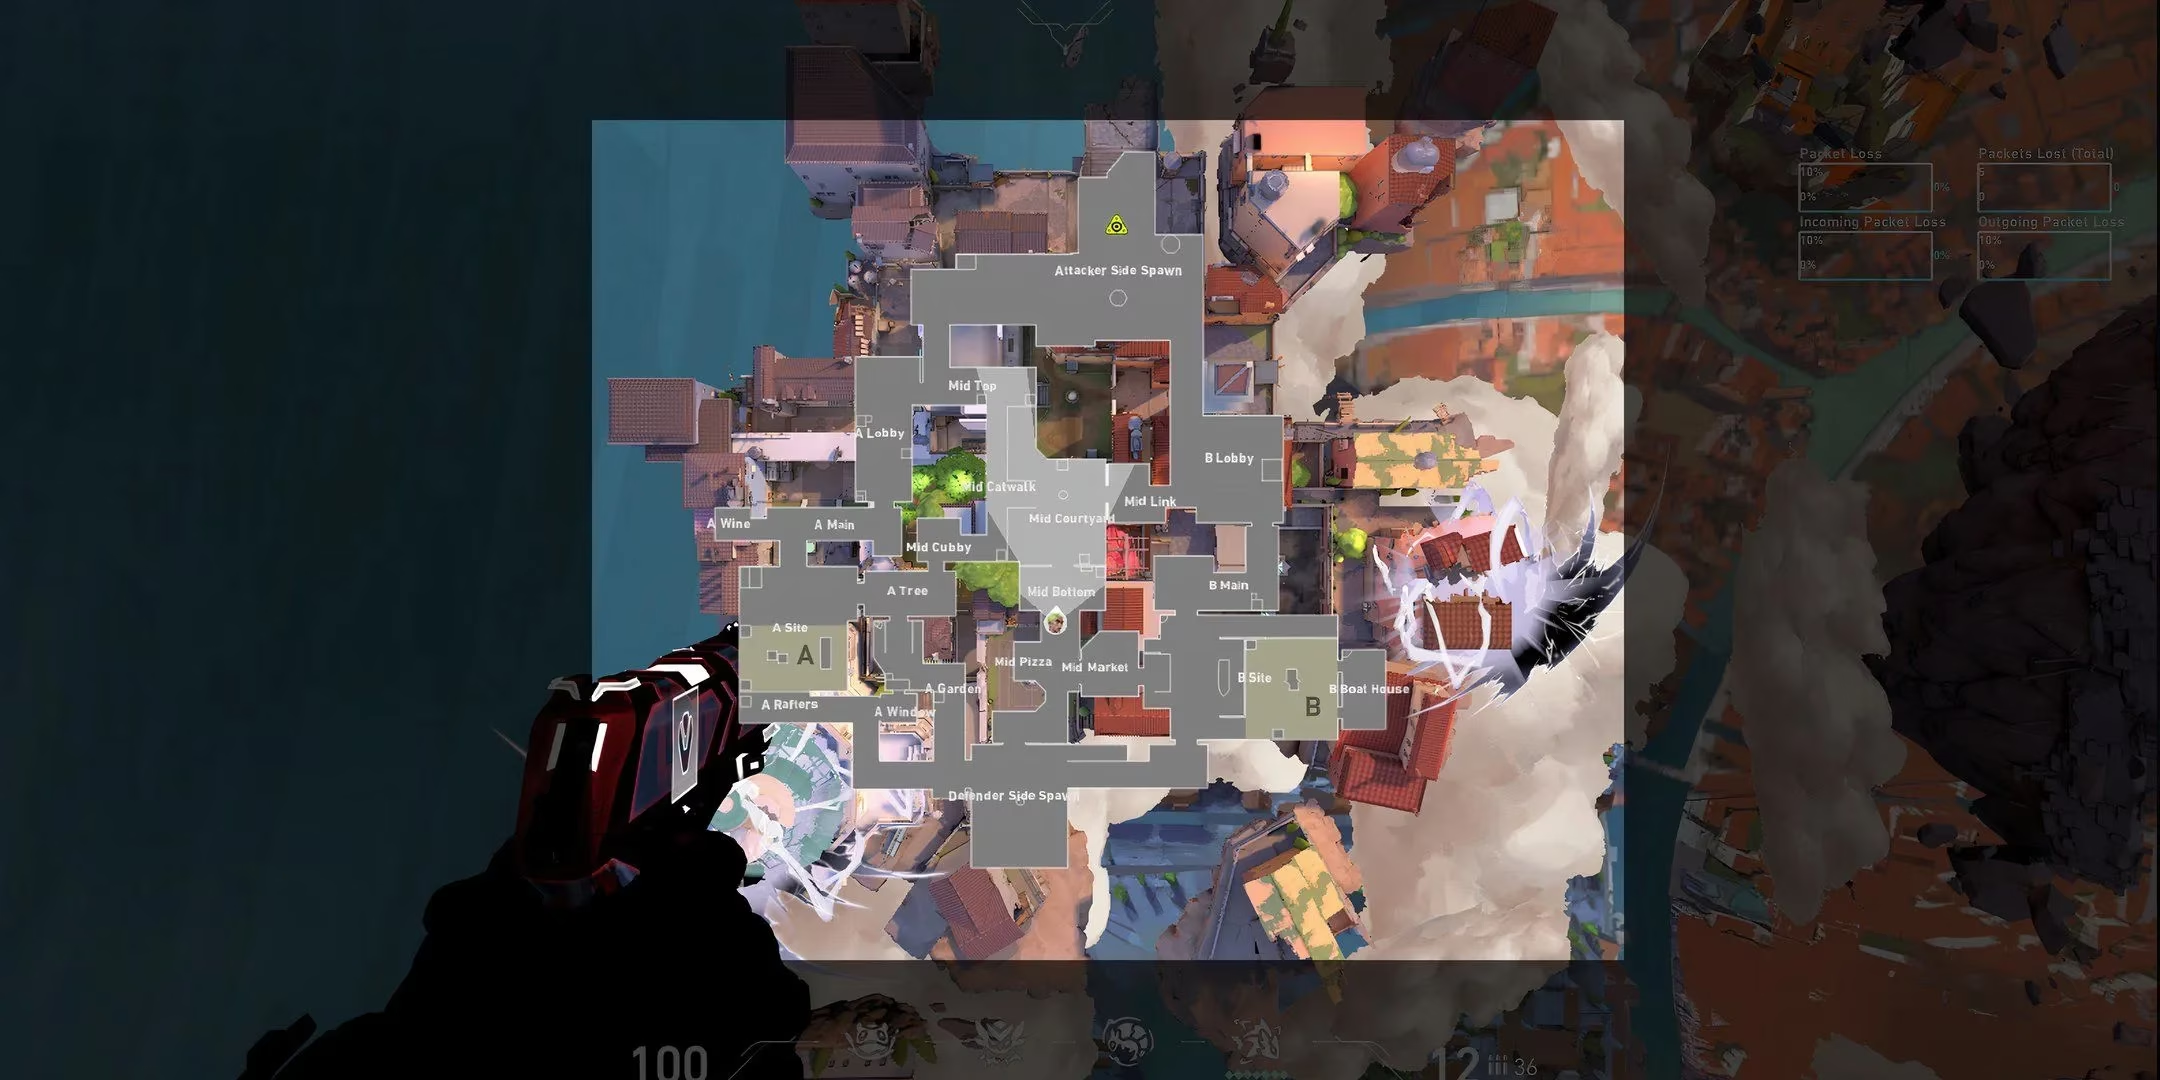
The Heart of the Map: Controlling Mid Like a Boss
First things first, if you don't control Mid, you don't control the game. It's that simple. Unlike other maps, Ascent's Mid is designed for fair fights. Both Attackers and Defenders have equal access to peek zones from B-Main and A-Lobby. This means raw aim can win you duels, but in 2025, utility and brainpower are what truly dominate.
Why Mid is EVERYTHING:
-
🚪 Split-Push Central: Both sites have one common entrance and one from Mid. Controlling Mid lets your team split the defense, overwhelming them from two angles.
-
Information Hub: Spotting even one enemy in Mid tells you exactly where the main push is coming from. It's a giant info-gathering zone.
-
🛡️ Flank Prevention: If you own Mid, the enemy team can't flank you. Period. It secures your team's back while you execute on a site.
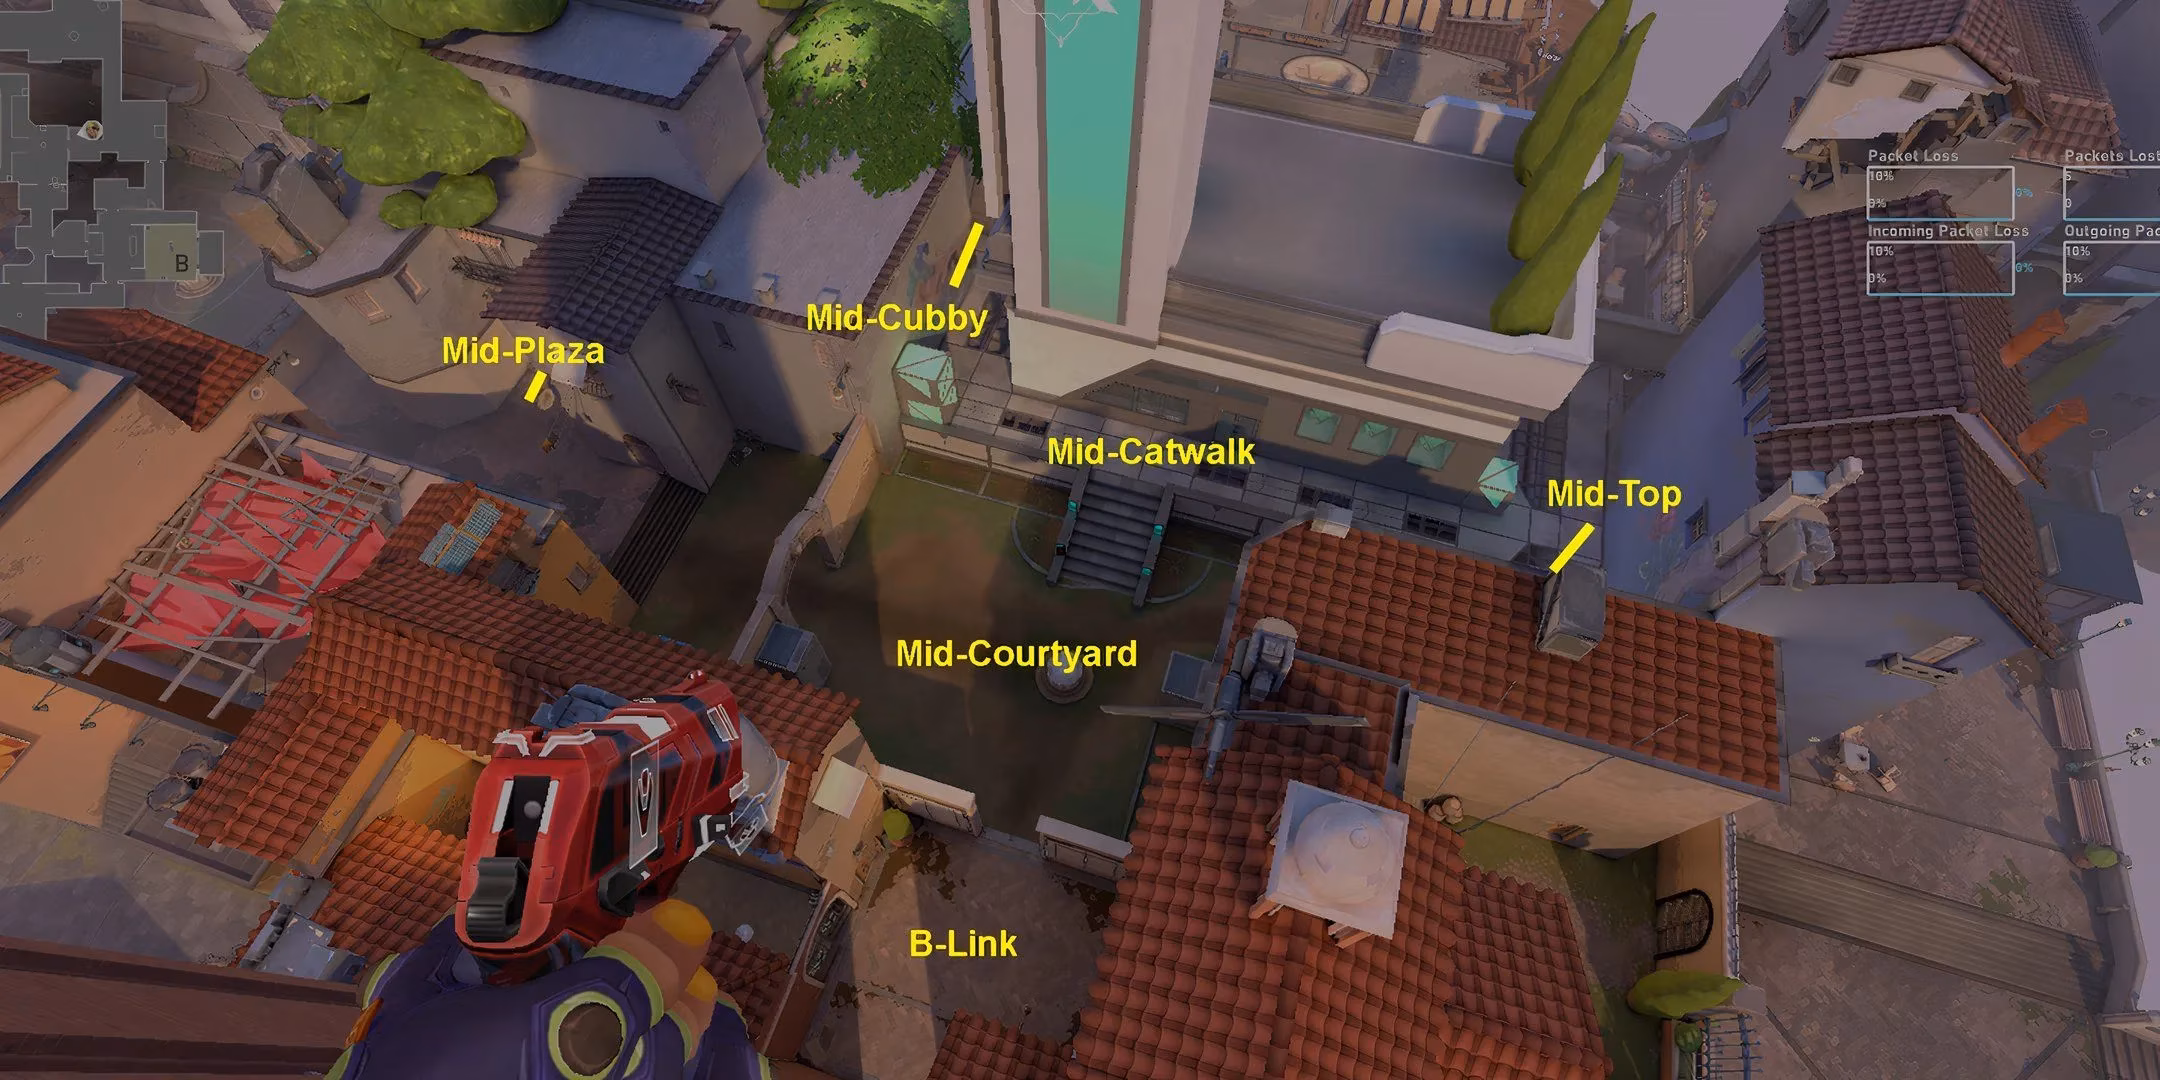
Key Mid Callouts & How to Play Them:
-
Mid-Top: This is the power position for long-range duelists. If you have an Operator or a Vandal, this is your home. You can lock down anyone pushing from Mid-Bottom or trying to cross to Mid-Cubby.
-
Mid-Courtyard: DON'T IGNORE THE DOORS! Those destructible doors are a game-changer. As an Attacker pushing B, you can use them to safely peek into Top or Cubby. As a Defender, you can listen for them breaking and get a free kill on someone who isn't checking corners.
-
Mid-Cubby: The gateway to A-Site. Defenders love holding here to watch A-Tree and Courtyard. Attackers need to clear this to safely push into A.
-
Mid-Catwalk: The sneaky flank route. If the enemy Defender in B-Market isn't paying attention, you can sneak through Catwalk and come out behind enemies in A-Main or A-Site. High-risk, high-reward!
Attacking Mid: Your goal is to secure it for a flexible execute. If your A push gets shut down, the player in Mid can create a diversion or even flank through the other site.

- Strategy: Use a duelist or initiator to take Mid-Top control. A Sova dart or a KAY/O knife can clear Cubby and Bottom. Once Top is secure, your team can decide: push through Catwalk to flank A, or drop down Courtyard to hit B-Market.
Defending Mid: Your goal is to gather information and delay. You don't always need to get the kill; just letting your team know "2 Mid, pushing towards A" is a massive win.
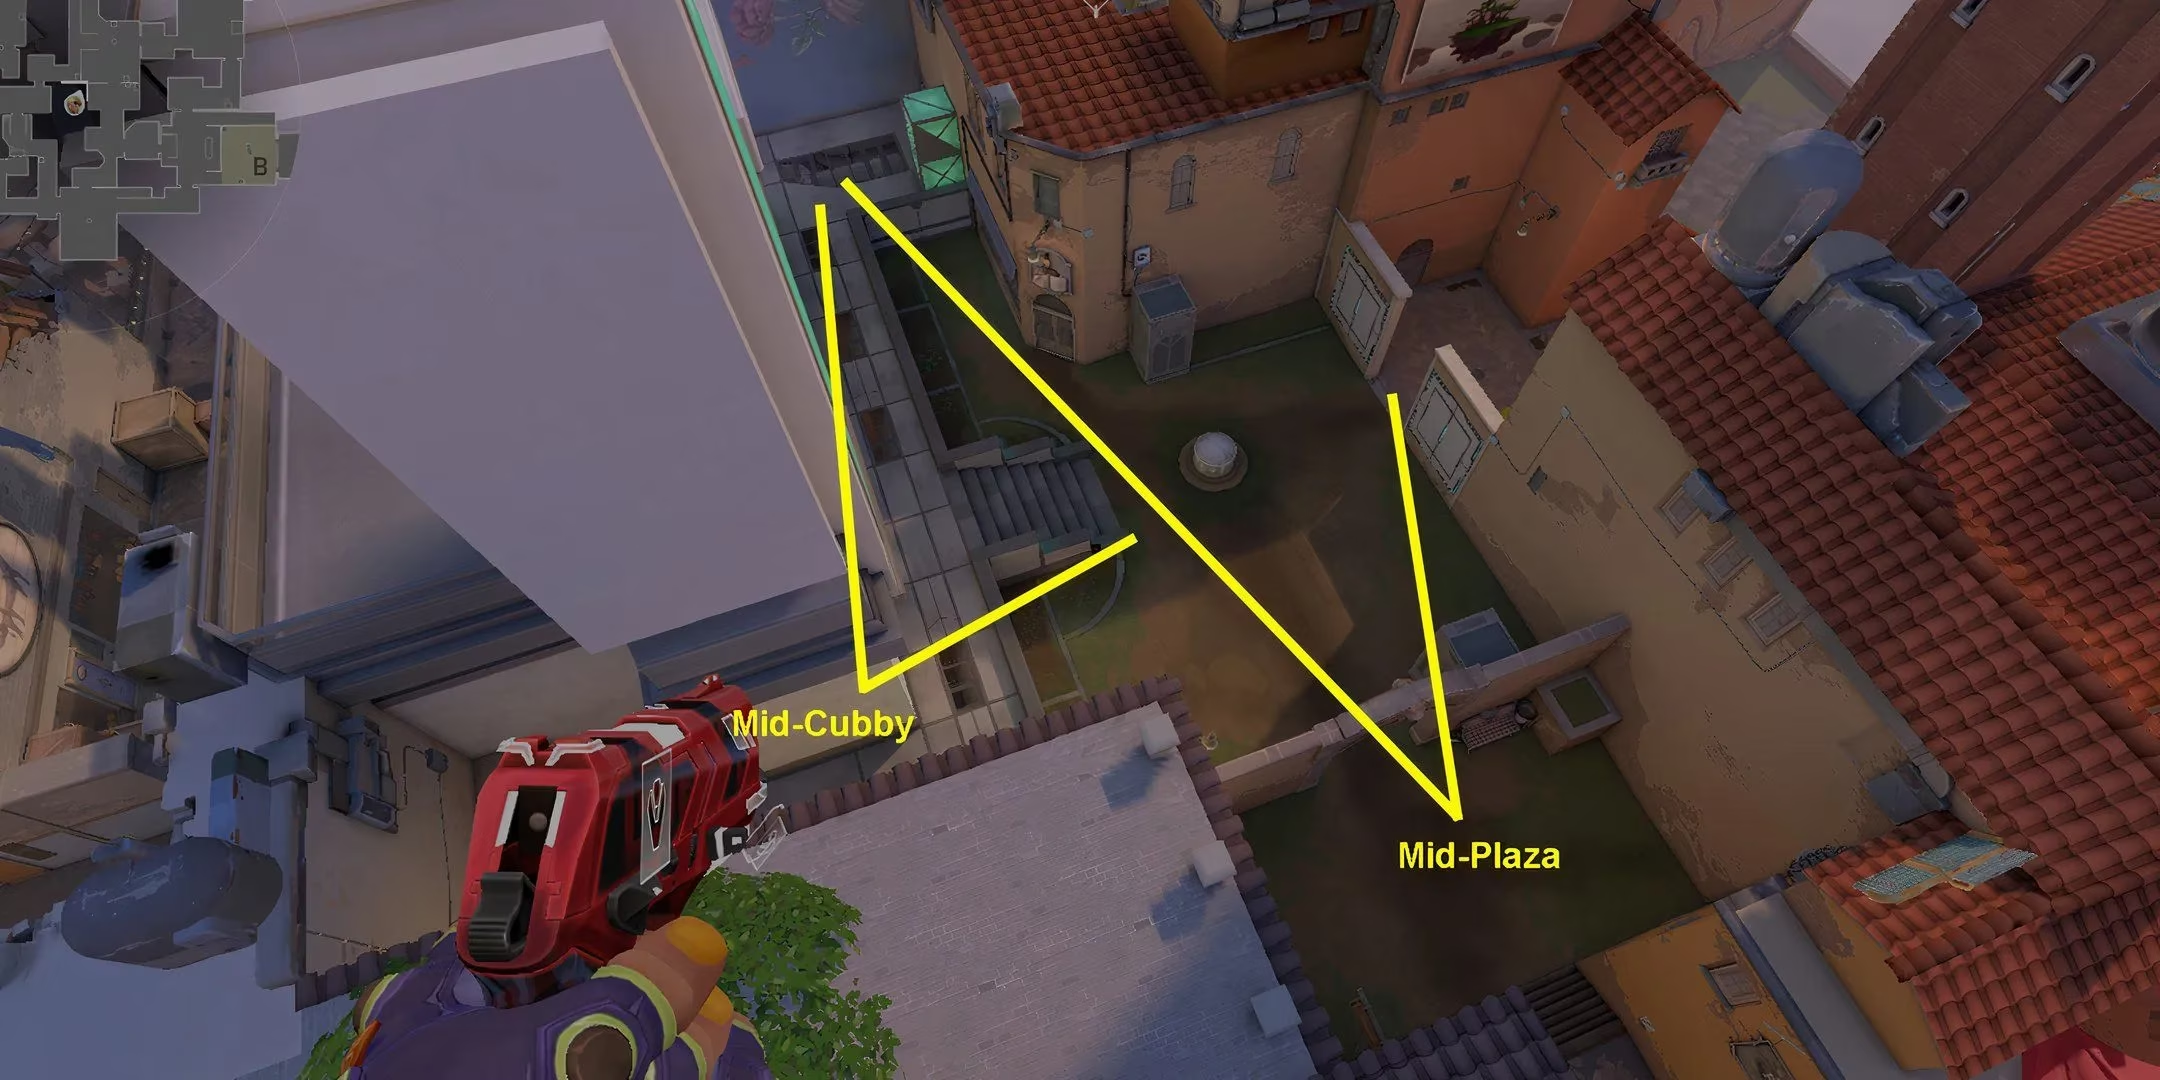
- Strategy: A Controller like Omen or Brimstone holding Mid-Plaza is deadly. They can smoke off angles, quickly rotate to a contested site, and catch Attackers in B-Market off guard. A Sentinel like Killjoy can also set up a Turret in Cubby to watch both Courtyard and the path to A.
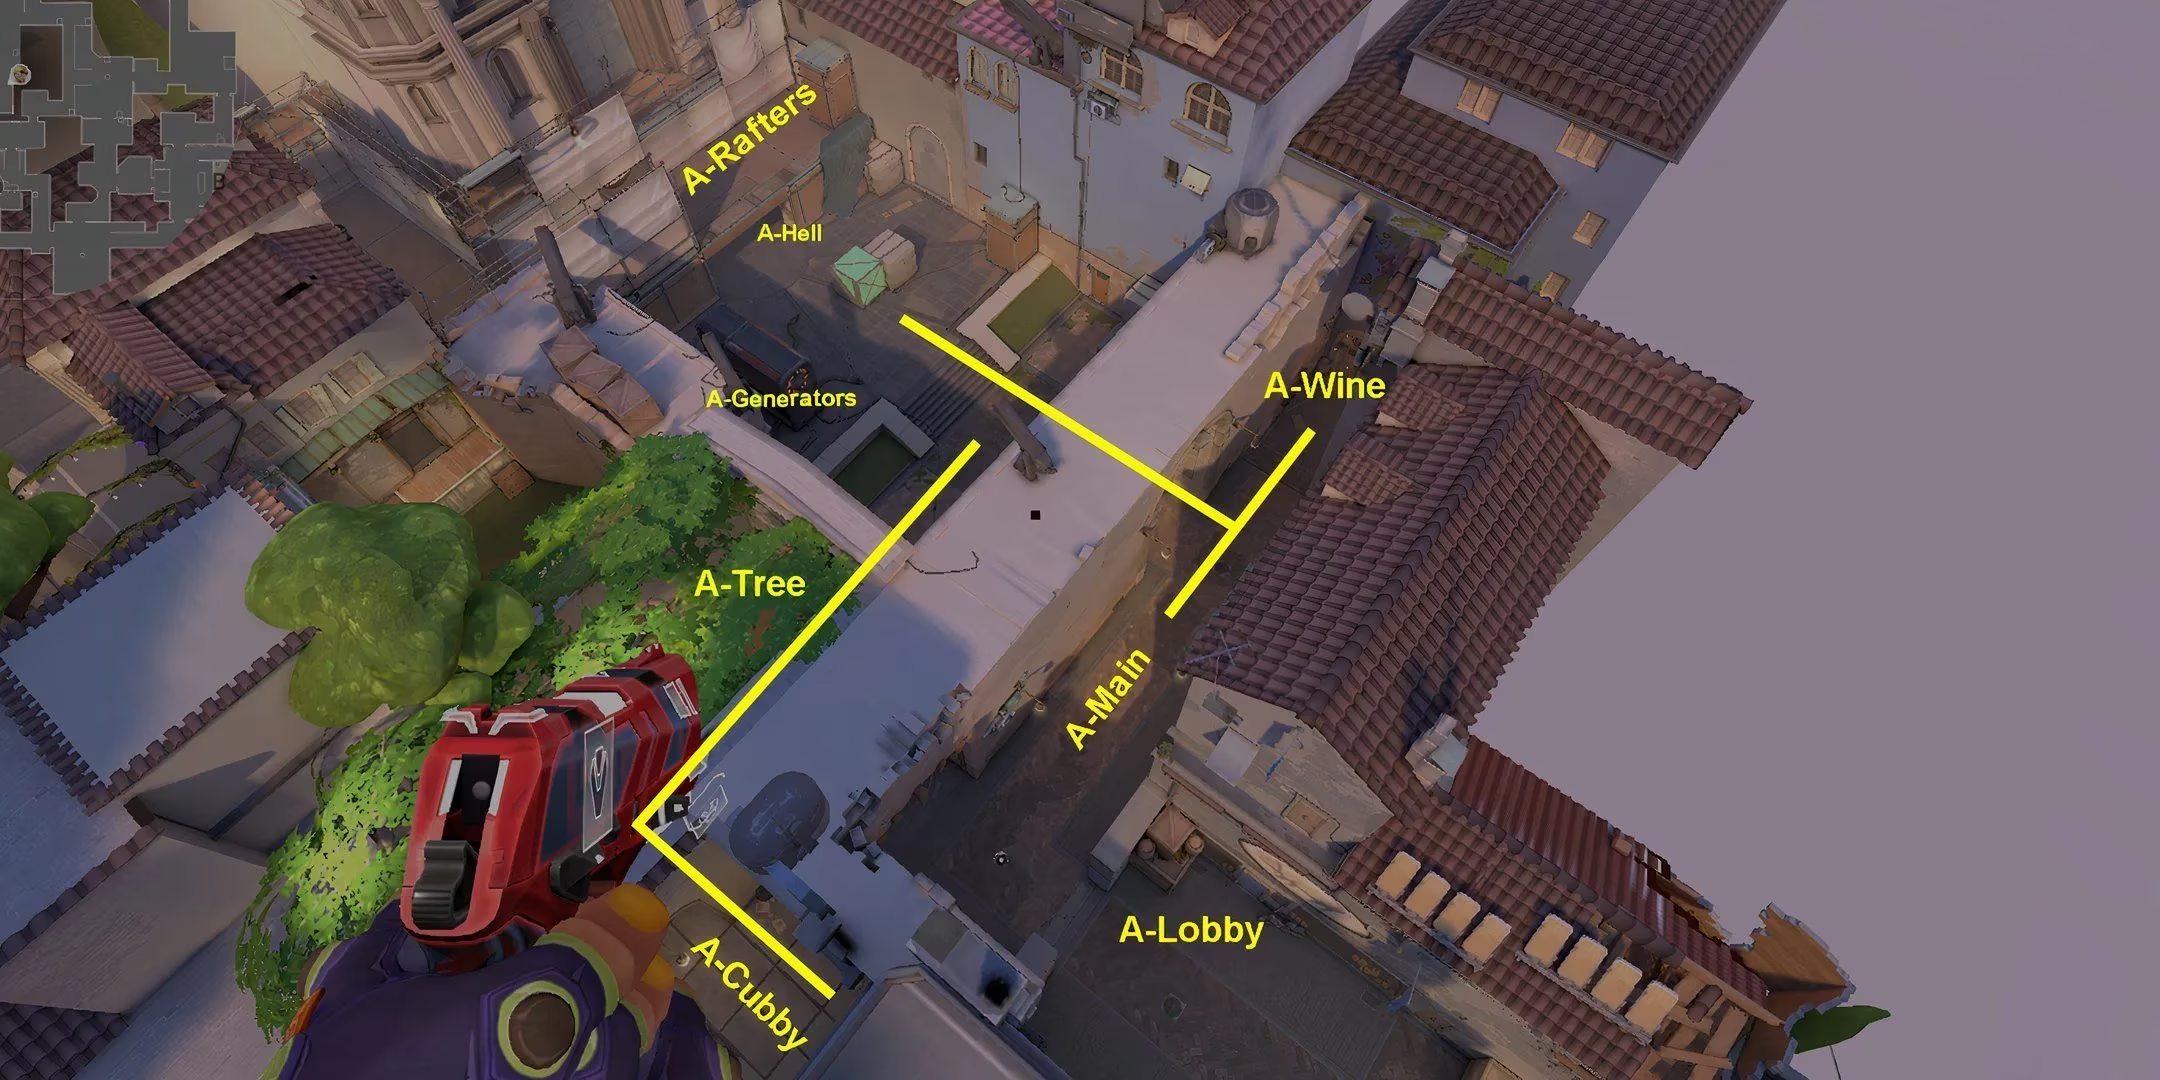
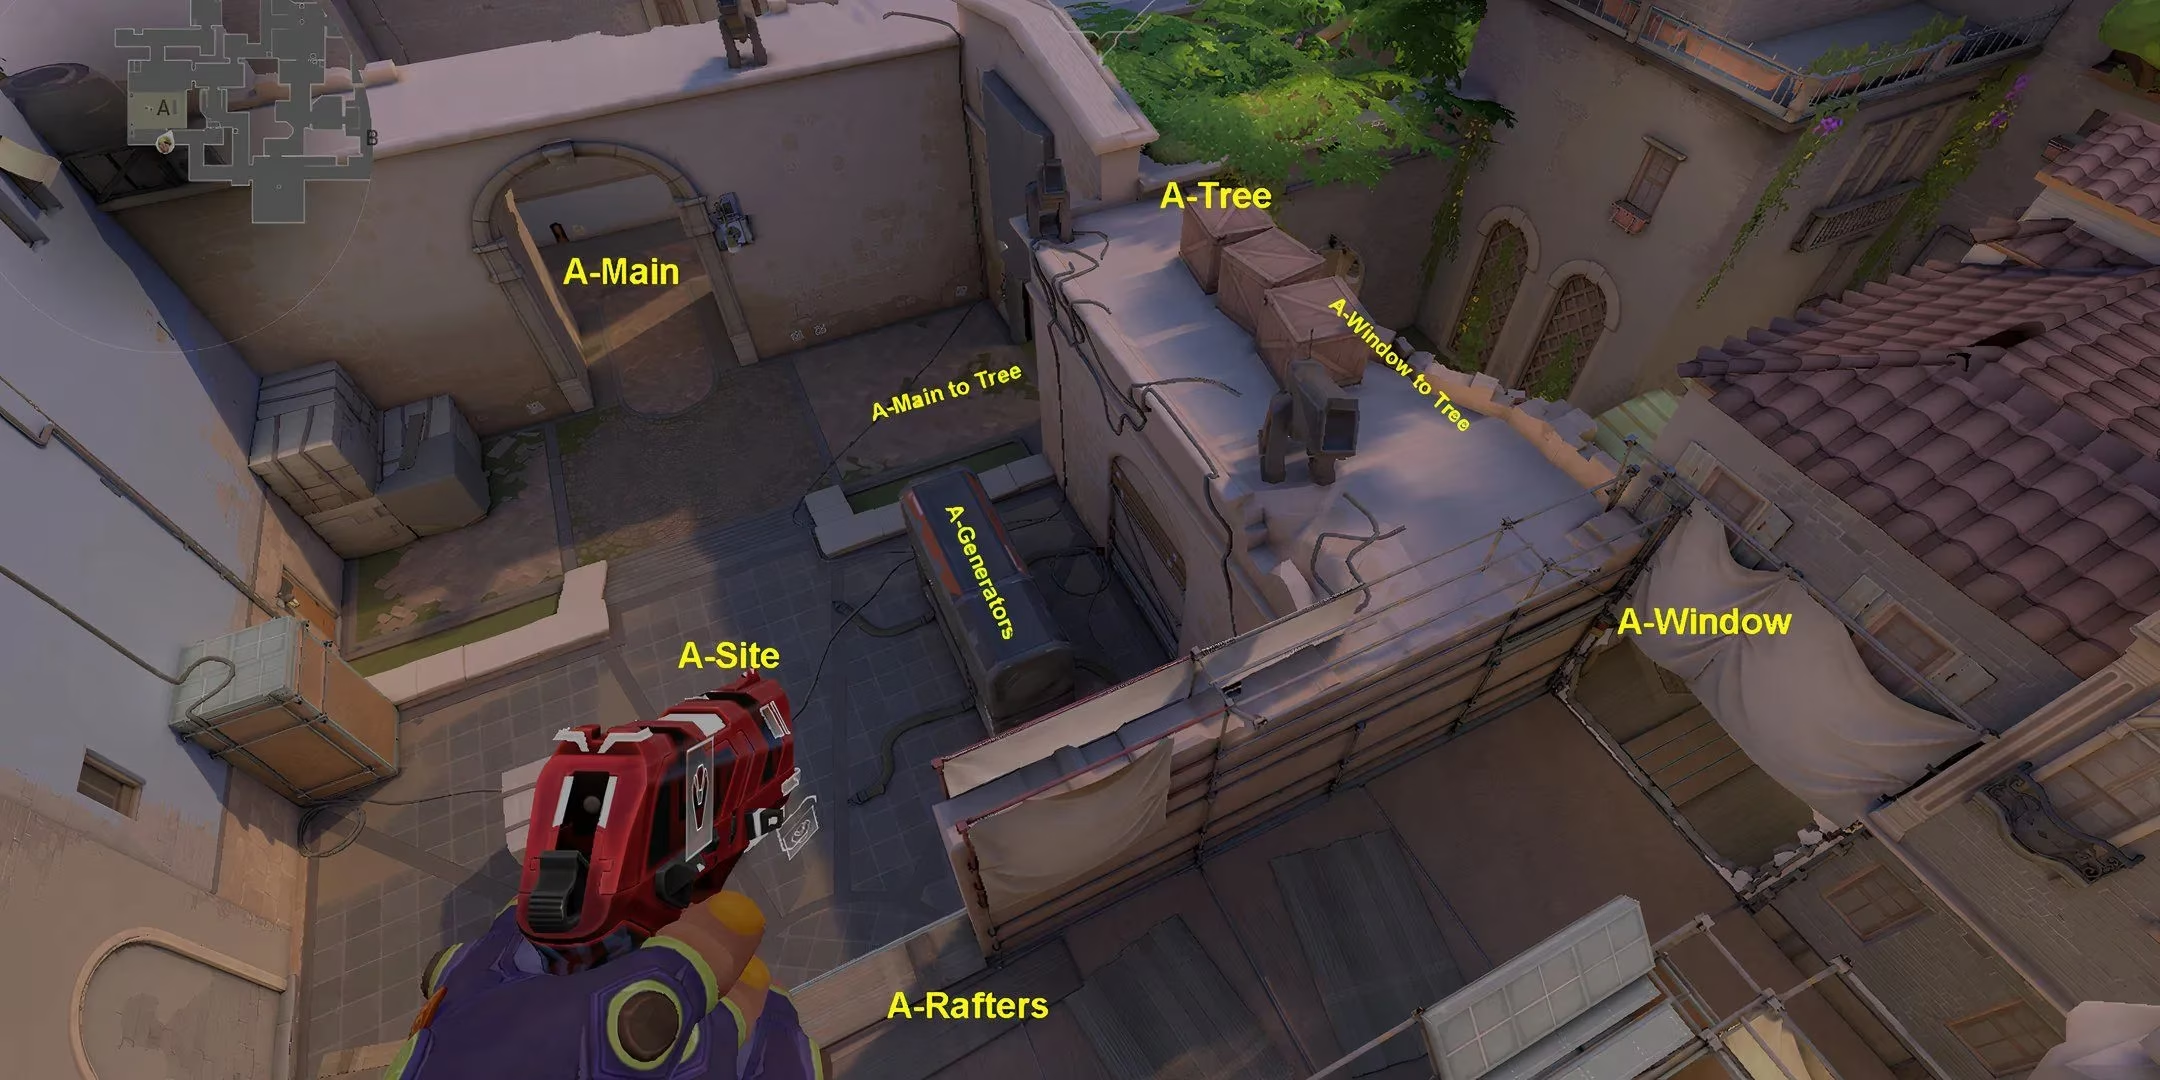
Conquering A-Site: Speed is Key
A-Site feels like a classic FPS bombsite—open, with a few key corners, and Defender-friendly high ground (A-Rafters). But that openness is a double-edged sword.
The most important feature here? The Bomb Doors near A-Tree. Closing this door as an Attacker after you take site is chef's kiss. It forces Defenders to either break it (loud!) or take the long way around through Spawn, giving you precious post-plant seconds.
A-Site Hotspots:
-
A-Hell: The ultimate post-plant rat spot. It's protected by two walls, and Defenders have to clear both sides to defuse. Just watch out for spam through the ceiling!
-
A-Generator: The big box in the middle. It's the most common Spike plant spot because it provides cover from most angles.
-
A-Wine: The sneaky corner at the end of A-Main. Perfect for a lurk or for a Controller to hide and protect the Spike post-plant.
-
A-Rafters: The Defender's paradise. Holding from here gives you a view of the entire site. But beware of utility being thrown up at you!
Attacking A-Site: You need to be FAST and AGGRESSIVE. A slow, hesitant push will get picked apart from Rafters and Hell.
-
Clear A-Main: Use flashes and drones. That Sage wall or Raze satchel to get onto the raised platform can catch Defenders off guard.
-
Triple Entry: Ideally, three players enter site together. One checks Rafters, one checks Tree/Generator, one checks the right-side corners.
-
Secure & Isolate: Once site is clear, one player should close the A-Tree Bomb Door. Someone should watch A-Wine for flanks from Mid. Plant for Generator or Hell.
Defending A-Site: Hold the angles, but be ready to fall back and retake. Don't give up free kills.
-
Early Round: An Operator or Marshal in A-Rafters can shut down a rush. A Sentinel should trap A-Main.
-
Hear Them? If you hear steps in A-Main, don't be afraid to use a molly or a smoke in the entrance to slow them down.
-
Retake Strategy: Use A-Window to get back onto Rafters safely. Coordinate flashes from Spawn and Cubby. Clearing Hell requires a coordinated push from both sides.
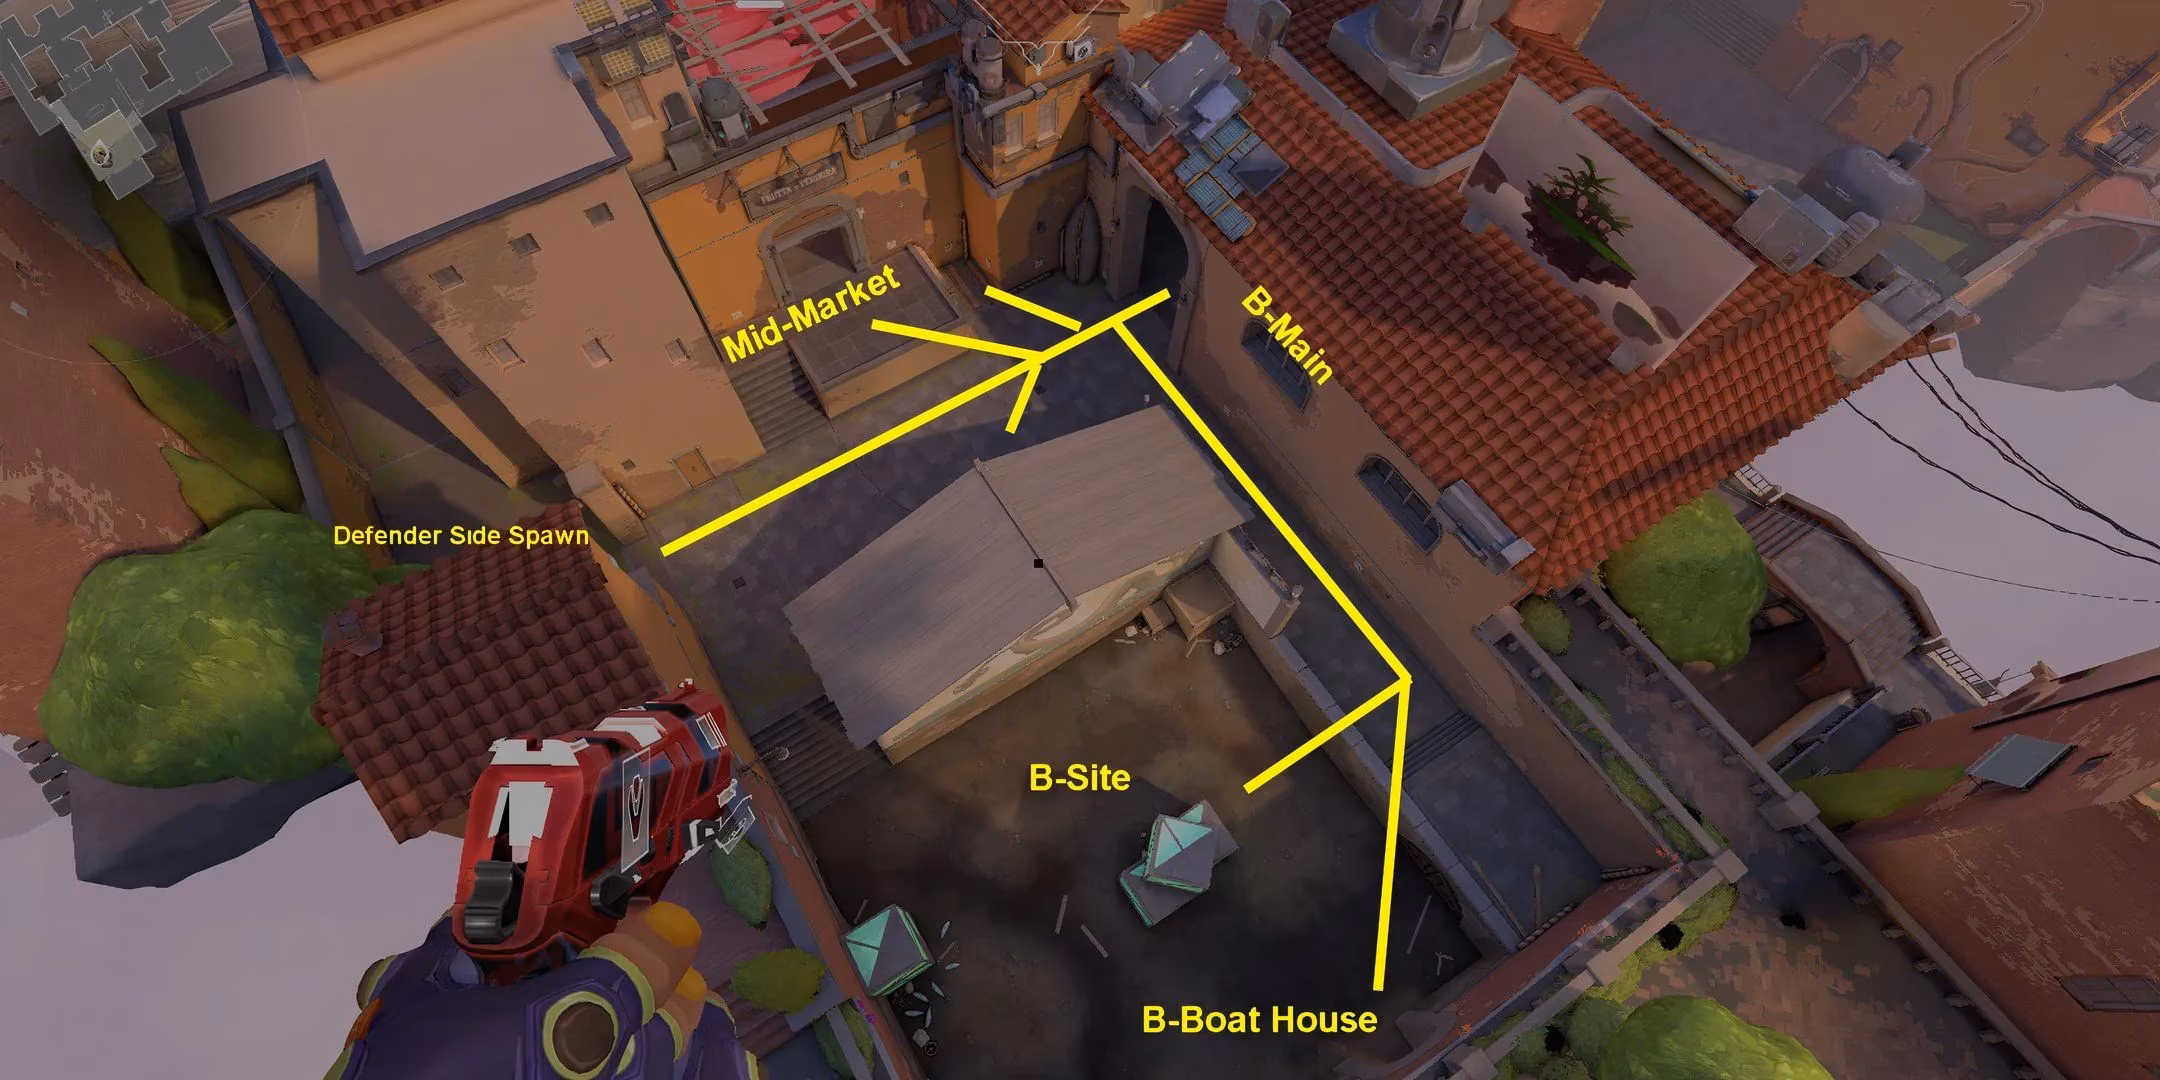
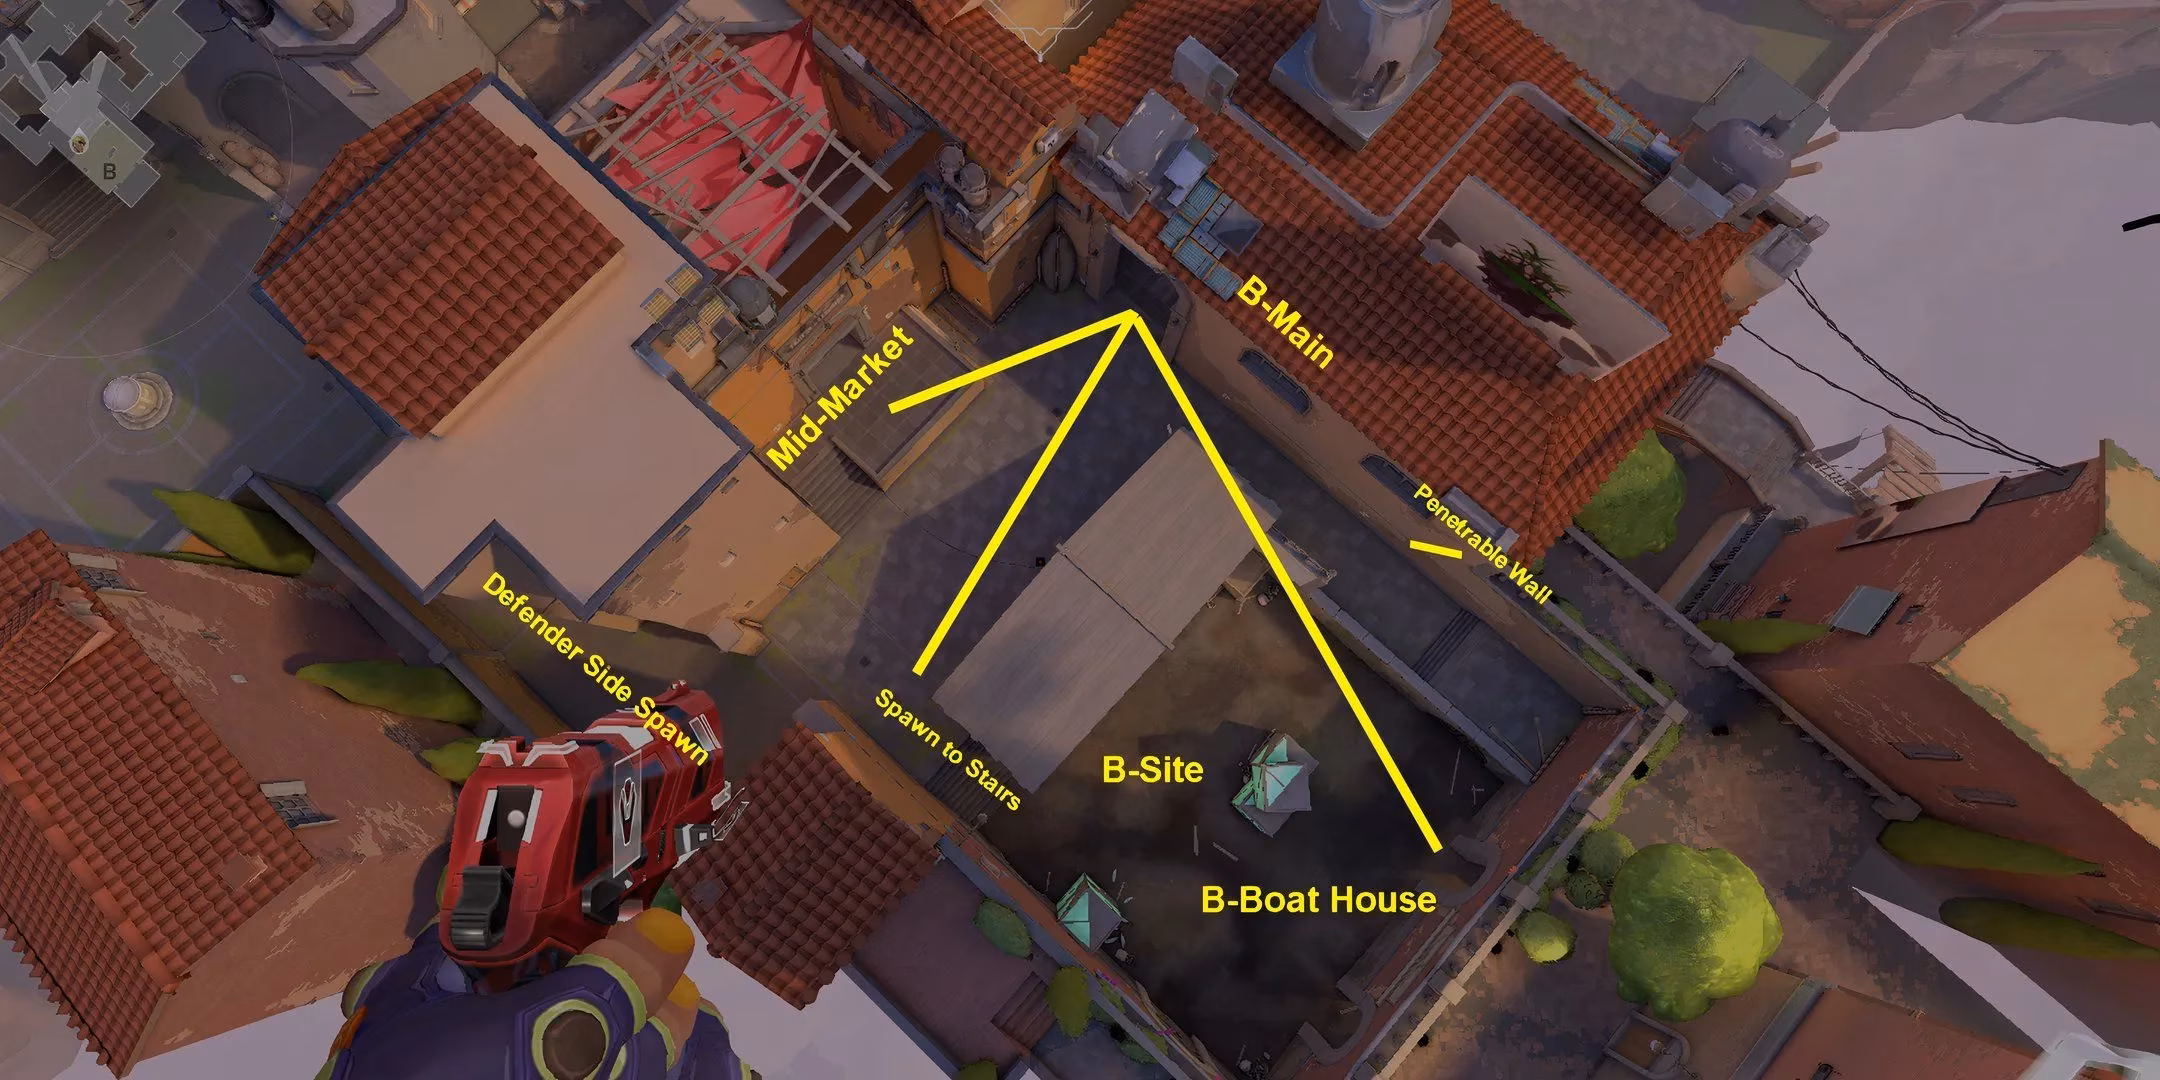
Locking Down B-Site: The Sentinel's Playground
B-Site is the polar opposite of A. It's cramped, claustrophobic, and a trap-happy Sentinel's dream. Defenders have a natural advantage here, but a well-coordinated Attacker team can crack it open.
The key feature here is the Bomb Switch for the Mid-Market door. An Attacker who gets to it first can lock a Defender out (or in!), completely isolating the site.
B-Site Hotspots:
-
B-Main Entrance: A death funnel. Expect a Killjoy Alarmbot, a Cypher Tripwire, and a molly waiting for you.
-
B-Boat House: The tiny room on the site. A Defender hiding here can wipe an entire team that doesn't check it.
-
Penetrable Wall: The wall with the animal graffiti near B-Main? YOU CAN SHOOT THROUGH IT. Odin and Ares users, this is your wall to spam. (But remember, they can spam back!)
-
Defender Side Spawn Corner: A classic headshot angle into B-Main.
Attacking B-Site: You cannot just run in. You must methodically clear utility.
-
B-Main Recon: Use Sova darts, KAY/O knives, or Fade prowlers to clear the corners and common trap spots. PRE-FIRE EVERYTHING.
-
Mid-Courtyard Control: Before you fully commit to B, make sure you've cleared Mid-Courtyard. This prevents a Defender from Mid-Top or Cubby flanking you.
-
Commit or Fake: If you're going B, GO B. A half-hearted push will fail. If you're faking, make it convincing with lots of noise and utility in B-Main, then rotate through Mid to A.
-
Post-Plant: Once planted, hold from Boat House, Defender Spawn corner, and maybe even back in Mid-Market. Defenders have very few safe ways to retake.
Defending B-Site: Set up your traps and play time. Your job is to delay, not necessarily get 5 kills.
-
Trap Galore: This is where Killjoy, Cypher, and Deadlock shine. Layer your utility. An Alarmbot behind a Nanoswarm. A Tripwire covering the Bomb Switch.
-
The Penetrable Wall Play: Have a teammate spot from Market while you spray through the animal graffiti wall with an Odin. Free kills!
-
Play for Retake: It's okay to give up the site if they execute perfectly. Fall back to Spawn or Market, wait for your team, and retake together with utility.
Meta Agent Picks for Ascent in 2025
Your agent choice can make or break your Ascent game. Here are my top picks:
| Agent | Role | Why They DOMINATE Ascent |
|---|---|---|
| Omen | Controller | ️ His teleports (Shrouded Step & Ultimate) are broken on this map. He can get to off-angles no one expects. His paranoia is perfect for pushing tight corners like B-Main. |
| Sova | Initiator | 🏹 Bouncing recon darts around all those corners? Yes, please. His drone is essential for checking B-Main safely. Shock dart lineups can clear defenders out of Hell or Boat House. |
| Jett | Duelist | 🌪️ The verticality of A-Rafters and Mid-Top is her playground. She can dash onto site, updraft for unexpected angles, and her smokes are great for quick site takes. |
| Killjoy | Sentinel | 🔬 The queen of Ascent. Her lockdown ultimate can single-handedly win a round. Nanoswarms on default plant spots and a turret watching Mid-Cubby are devastating. |
| KAY/O | Initiator | 🔪 His knife suppresses traps and reveals enemies through walls, which is crucial for clearing B-Site. His flash is one of the best for peeking tight angles, and his ultimate lets you lead the charge on a retake. |
Final Pro Tips from a Grinder:
-
🎯 Practice Your Pre-Fires: Ascent has known corners. Go into a custom game and learn the exact headshot height for A-Wine, B-Main corners, and Mid-Cubby.
-
🔊 Sound Cues are King: You can hear the Bomb Doors opening/closing from miles away. You can hear people jumping onto A-Rafters or dropping down Mid. USE THIS INFO.
-
🔄 Don't Be Predictable: Yes, the map is "predictable." So break the mold! Sometimes take early Mid control as Defender. Sometimes slow-play A as an Attacker. Keep them guessing.
That's it, folks! Ascent is a map of fundamentals, but mastering those fundamentals will make you a better player on every map. Get out there, use these strategies, and start floating your way to the top of the leaderboard! Remember, it's not just about aim; it's about outsmarting your opponent. GG, go next! 😎