In the ever-evolving tactical landscape of Valorant, lineups remain a cornerstone of high-level play, transforming agents like Sova from mere scouts into architects of information. As of 2026, the underwater metropolis of Pearl continues to be a playground for strategic ingenuity, where a well-placed Recon Bolt can unravel an enemy's defense like a master key in a complex lock. While many lineups are designed for post-plant denial, Sova's versatile toolkit allows for proactive information gathering from the round's outset, making him an indispensable asset for any team seeking to dominate this sprawling cityscape. Mastering these setups is less about memorizing angles and more about conducting a silent symphony of surveillance, where each bolt is a note that reveals the enemy's hidden composition.

The A-Main Universal Recon: Clearing the Entry
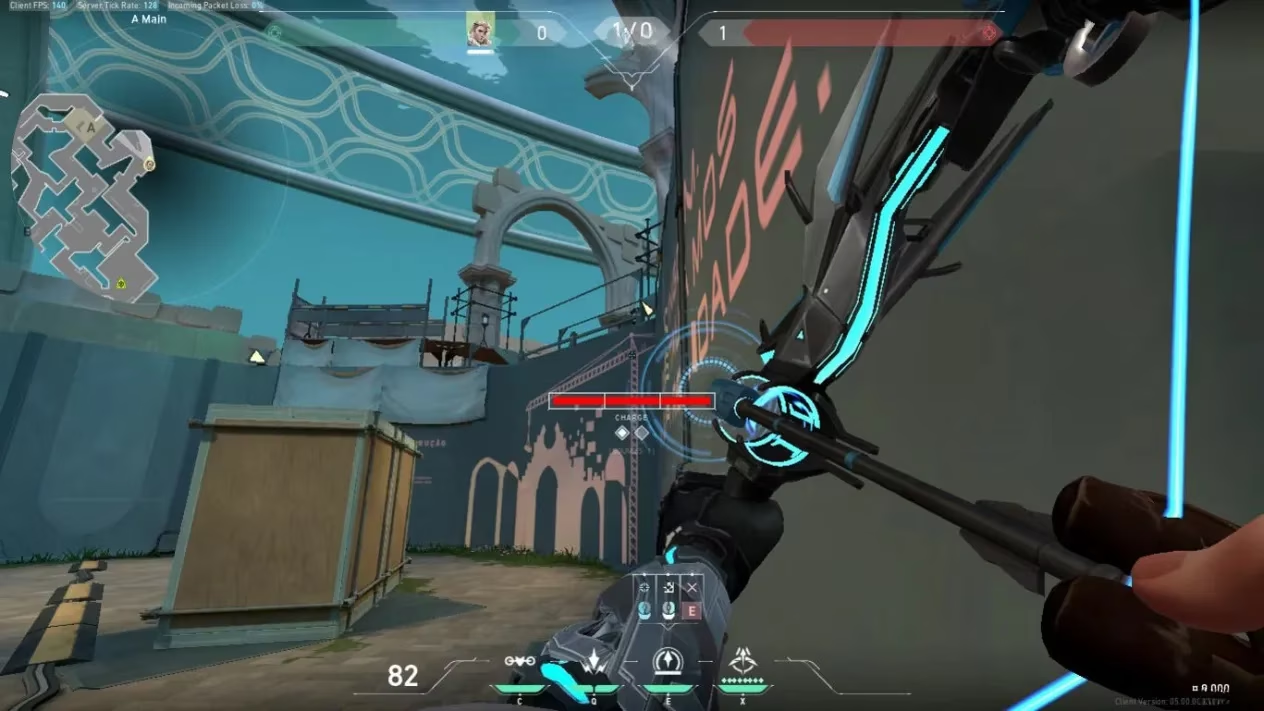
This is arguably Sova's most fundamental and powerful lineup on Pearl, a foundational move every aspiring initiator should have in their arsenal. Executed from A Main, it acts like a surgical scanner, designed to reveal every nook and cranny of A Site, Secret, and potentially Dugout.
-
Location: Upon entering A Main from A Restaurant, locate the wall with "KINGDOM" and three yellow stripes. Press against the stripe closest to you.
-
Aiming Reference: Turn around to face the adjacent wall art, which resembles a large industrial crane.
-
Execution: Pull out your Recon Bolt. The precise aim is critical—target the bottom-left triangle of the block on the top-right section of the crane art. Charge the bolt fully and ensure one bounce is active before firing.
-
Result: The bolt will arc perfectly to land on the edge of the site building, exposing any defenders lying in wait. Think of it as casting a sonar net over the entire area; any movement within its pulse is instantly illuminated.
The A-Restaurant Double-Clear
Positioned in A Restaurant, this lineup serves a dual purpose, clearing two critical angles for a team push. It's the tactical equivalent of a janitor sweeping two dark corners with a single, efficient motion.
-
Location: In A Restaurant, find the elevated platform beside the first staircase near the two-box stack. Stand at the platform's very edge.
-
Aiming Reference: Look upward and align your HP HUD just below a specific gap in the left building's wall. Your crosshair should settle on a thin white stripe at the top.
-
Execution: This requires a gentle tap. Simply press the fire button (M1) without any charge. Adding even a sliver of charge will send the bolt off-course.
-
Result: The bolt will gracefully land, revealing enemies tucked into the right corner of A Site entry and those holding A Link, providing safe passage for your team.
The Mid Doors Ambush Catalyst
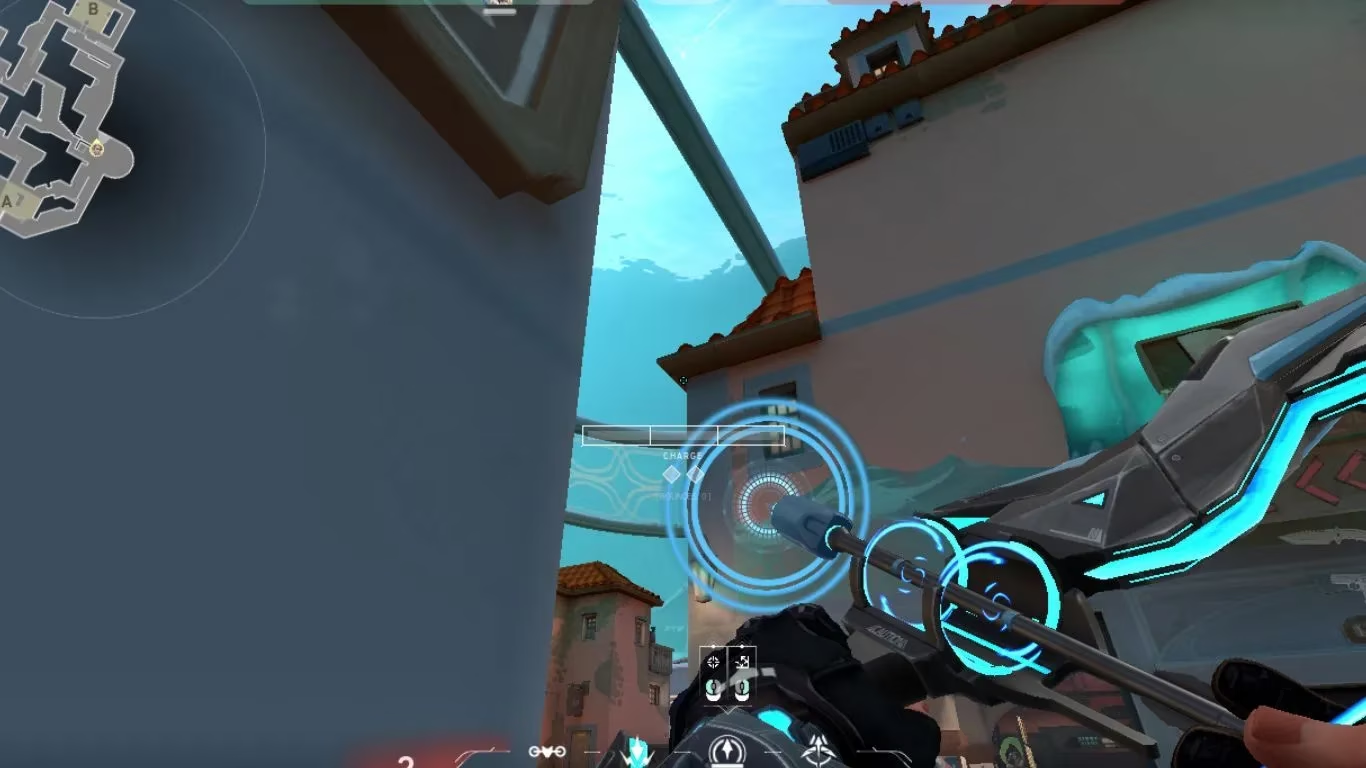
A more advanced but devastatingly effective lineup, this turns Mid Doors from a dangerous chokepoint into a death trap for camping defenders.
-
Location: From Attacker Spawn, face the restaurant and find the brown door with a yellow handle on the first right-hand building. Center yourself against it.
-
Aiming Reference: Turn around and aim high. The trick is to align the left wheel of your drone ability HUD with the top-right corner of the left lamp on the Mid doorway.
-
Execution: Charge your bolt to one and a half bars before releasing.
-
Result: The bolt lands directly above the box near Mid Doors, revealing anyone in Mid Doors or B Link. The true power lies in the follow-up: as the bolt pings the enemy, you can push through Top Mid and wallbang the fragile doors for an easy, bewildering kill. It’s a perfect ambush, springing a trap where the enemy feels most secure.
Mid Plaza to A Site: The Flank Watch
After securing Mid control, this lineup answers the crucial question: "Where is the rest of the enemy team on A?"
-
Location: In Mid Plaza, find the white elevated structure to the right of Mid Doors. Ensure the area is safe first.
-
Aiming Reference: Press into the center of this platform, then look to the right. Find the gap in the building at the top and align the bottom-right edge of your drone HUD icon with the bottom-right edge of that gap.
-
Execution: Charge the shot just past the first bar.
-
Result: The bolt will land on the edge of Dugout, scanning A Link and the front of A Site. This provides the critical intelligence needed to execute a safe site takeover from Mid, acting like a periscope from the depths of the plaza.
Defensive Recon: Holding A Site from Within
Not all lineups are for attackers. This defensive setup from the back of A Site is a sentinel's best friend.
-
Location: At the back of A Site, behind the central structure, find the door marked "APENAS." Push against it.
-
Aiming Reference: Look toward the doorway leading to A Main. Aim at the top center of the frog-like figure above the door.
-
Execution: Charge the bolt a little past the first charge level.
-
Result: The recon flies into the chokepoint between A Main and A Restaurant, revealing any attackers gathering for a push and giving defenders precious seconds to react.
B Site Control: From Defense and Attack
B Site on Pearl is notoriously difficult to assault and retake. These two lineups provide essential leverage.
From Defender Spawn to B Main:
-
Location: At Defender Spawn, go to the pillar labeled "B" near Waters. Get close with it centered on your screen, then look right towards the site.
-
Aiming Reference: Aim your crosshair at the hut of the building on the right, slightly left of its edge to avoid obstruction.
-
Execution: Charge to the first bar and fire.
-
Result: Reveals enemies in B Main and near the default plant box, crucial for retaking a lost site. It’s like sending a silent probe into the heart of enemy territory.
From Attacker Spawn to B Site:
-
Location: From Attacker Spawn, take the left alley to Mid Shops/B Club. At the end, on the right, find a dividing edge between two walls and press against it.
-
Aiming Reference: Turn around and aim at a white stripe at the top of the structure. The exact spot is forgiving; anywhere near the reference image works.
-
Execution: Charge the shot a little past the first bar.
-
Result: The bolt soars over to B Site, revealing players peeking from Tower or the tunnel and flushing out campers behind Screens. This lineup acts as an aerial spotlight, suddenly and unexpectedly illuminating the enemy's defensive setup.
Mastering these Sova lineups on Pearl is akin to learning the secret passages of a grand library; they grant you access to knowledge your opponents assume is hidden. In 2026, as the meta continues to shift, these foundational yet powerful techniques remain a testament to strategic depth, proving that information, delivered with precision and timing, is the most powerful weapon in any agent's arsenal.